You are Visitor number
![]()
|
|
|
You are Visitor number
|
IT IS STRONGLY SUGGESTED THAT YOU NOT ATTEMPT TO LIGHT ANY GASOLINE BLOW TORCH. THEY ARE SIMPLY TOO DANGEROUS. THERE IS NO RELIABLE WAY TO DETERMINE IF A TORCH IS SAFE TO LIGHT BECAUSE THERE ARE TOO MANY VARIABLES! THE INFORMATION CONTAINED ON THIS WEB SITE IS NOT INTENDED TO BE USED AS INSTRUCTIONS FOR OPERATING A BLOW TORCH!
The information contained in this web site is intended for educational and historical purposes only. Here are the ground rules and conditions under which you must agree to comply, in order to view this web site:
You agree to hold harmless the author of this web site from any legal action that results from your use of information on this web site.
You understand that the descriptions in this web site are strictly written accounts of the author's experiences and/or opinions and are not represented in any way as instructions for lighting, operating or repairing a blow torch. It is not intended that the reader try to light a gasoline blow torch after reading any of the contents of this web site.
You agree that you are responsible for your own actions. If you proceed to light a blow torch after I have specifically cautioned you not to do so, you and you alone are responsible for your actions.
This web page is copyrighted. You are not to reproduce anything on this web site without written permission from me. You are granted permission to print out all or portions of this web page so long as the information will be read by you only. Obviously, you may freely distribute the URL for this web page to interested persons.
You promise not to try to light a gasoline blow torch. This is no joke! They are very dangerous and look and seem harmless. As you will see after reading my Horror stories page, you will realize that they are not harmless and you will understand why.
This information is not guaranteed to be useable for any specific purpose, other than education. I am simply sharing my experiences with you. I do not represent a manufacturer, nor should any part of this web page be construed as manufacturer's instructions.
I have a rather twisted sense of humor and some of my descriptions could be construed as crude. Therefore, If you are easily offended by such things, then please do not read any further. If you are offended by anything that I have presented on this web page, that is certainly not our intent.
YOU ARE NOT AUTHORIZED TO WIEW THIS WEB PAGE ANY FARTHER UNLESS YOU AGREE TO THESE TERMS. IF YOU CHOOSE TO READ ON, THEN IT IS ASSUMED THAT YOU ARE AGREEING TO THE TERMS OF THE USAGE AGREEMENT ABOVE.
The web page author and owner is Jeff Glass. On the web, Jeff Glass IS Zangobob!
Try our new Email Address! Feel free to send me an email.
Our old email address will be maintained for a short time. Please make a note of our new one.
What would you like to know about blow torches?
This web page focuses on the use, functional operation, repair, troubleshooting and failure mode analysis of gasoline blow torches. These are the quart and pint sizes as well as SOME of the gasoline and alcohol miniature torches, sometimes referred to as homeowner's torches. Throughout my web page, I will be doing my best to discourage you from actually lighting a blow torch. This is a very dangerous thing to do, even though I do it myself. I will be sharing with you my experiences with lighting, using and repairing these blow torches. However, at no time should you assume that these writings are INSTRUCTIONS on how to light or repair a blow torch. My writings herein are of my experiences and opinions only. It is not the primary intent of this web page to discuss the dates of manufacture or the appraisal of any blow torch. This web page is dedicated to the preservation of the technology of gasoline blow torches.
I do feel that it is the responibility of all persons that collect blow torches for the purpose of preserving the history and heritage of them to be diligent about properly reassembling their torches by putting the correct parts with the correct torch and reassembling it correctly. When reassembling, do not arbitrarily decide what part is insignificant and therefore can be discarded and what parts to keep! All of those parts are what make up a blow torch and if you are preserving the blow torch, I feel that you are obligated to preserve all the parts and properly reassemble it! Furthermore, if the torch is cleaned, the innards should also be brought back up to full operability where possible. Otherwise, what do you have other than a brass and bronz thing that looks pretty? THIS DOES NOT MEAN THAT YOU SHOULD ACTUALLY FUEL AND LIGHT YOUR TORCH! You cannot claim that you have a reconditioned, refurbished or mint condition blow torch simply because you cleaned up the outside of it. Throughout this web page, I will be describing the cleaning and repair procedures for a torch up to the point where it could actually work. I will then explain how the torch is lit and then show you pictures of how it is done. DO NOT ATTEMPT TO LIGHT THESE TORCHES!
Of primary importance is to use this web page to disseminate the highest quality, technically oriented blow torch information possible and to keep this web page as functionally simple as possible. I am an engineer by profession, so my knowledge, and thus the contents of this web page, are technical in nature. I know very little about the history and the years that particular torches were made. If anyone as information of this type, I would love to hear about it. I do not profess to offer credible advice regarding the value of a particular torch.
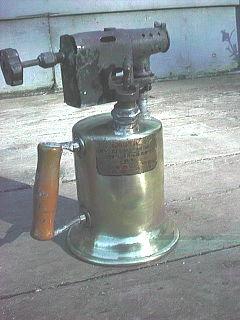
No discussion about the preservation of blow torches would be complete without describing what a blow torch actually is. Therefore, since this page is dedicated to gasoline blow torches, this description will be restricted to torches of that type. There are components that every blow torch must have and the first such component is a fuel tank to hold the gasoline. The tanks are designed to hold a half pint to a quart of fuel typically, with a few exceptions. Filling the tank is accomplished by removing a plug in the bottom or removal of the pump.
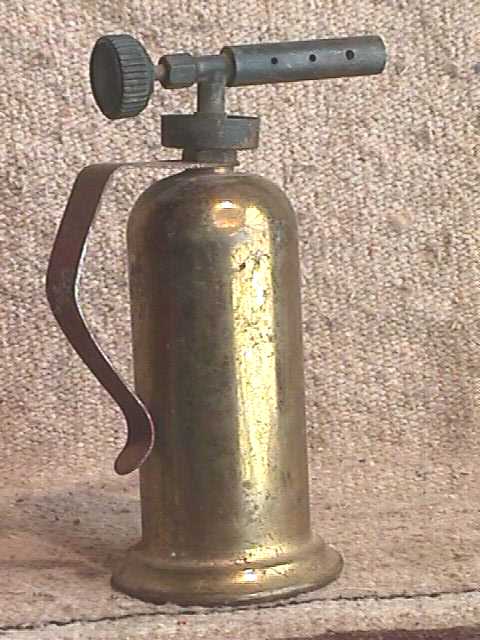
All torches, regardless of their size, must have a pressurization system. The pint and quart sizes have a manually operated plunger type pump for building up enough pressure to force the fuel out of the torch with sufficient velocity. The little blow torches do not have or need an air pump to pressurize them. Instead, the heat produced by prewarming the burner head is enough to build up sufficient pressure.
All torches big and small, must have a fuel wick system to draw the fuel out of the tank regardless of the operating position of the torch. A blow torch must have a carburetor, which consists of the orifice, burner head and the air holes in same, as well as a chamber where the fuel and air are mixed together for combustion. Finally, all blow torches must have a control system that will allow the fuel flow and therefore the flame intensity, to be adjusted or shut off.
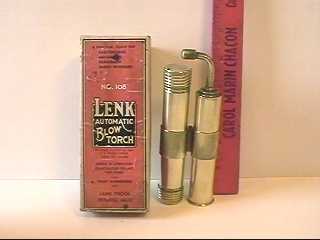
Any torch that has a burner head with an orifice and an air mix chamber is capable of a self sustaining flame. Very small torches, such as the Jim dandy or the Lenk 105, only have an orifice. These torches mix the fuel in open air therefore are incapable of sustaining a flame without help. This type of torch has an auxiliary wick that is lit which heats the orifice as well as provides a flame to ignite the fuel and air mixture. As long as this auxiliary wick burns, the blow torch will burn.
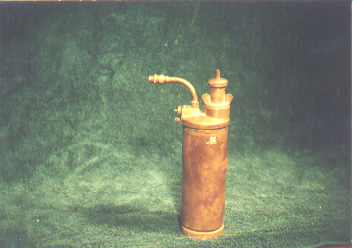
So, the next time someone presents you with a blow torch, you now have enough knowledge to tell if it really is a blow torch or a sprayer! Yes, there are old sprayers out there that look like a blow torch! They have a tank, they have a pump and they have an orifice; But what they don't have is an auxiliary wick or a burner head. Therefore, they cannot very well be a blow torch ! Occasionally you will see sprayers for sale on the Internet that are advertised as blow torches ! Their sellers are not deliberately being deceitful, they probably do not know the difference. Hopefully, now you do! By thoroughly understanding what a blow torch is and how it works, you will be able to verify that all the needed components are there. This knowledge is also useful in making sure that a blow torch that you want to buy is not missing any of its vital parts.
There are many approaches to managing your blow torch collection. One is to specialize in old torches that have never been used. These usually come with the original box and operating instructions. The only sign that the torch has been lit is the small amount of carbon on the burner from the test firing at the factory. There are old torches in existence that have never been used, and they are hard to find. Farm auctions and Ebay are your best sources for these.
Yet another collecting style is to buy torches that are physically complete that may or may not have been used. If you are this type of collector, you will have many choices. Some collectors of this type specialize in one manufacturer or one type of torch, i.e. quart sized, pint sized, miniatures, etc. Some collectors specialize in the unusual only, such as special puropse types that are not very common. Still other collectors buy only the very old specimens from a particular era, such as the late 1800's or early 1900's.
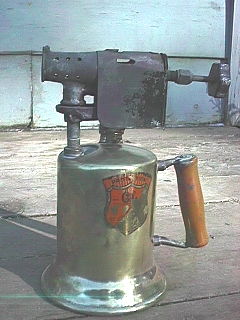
To clean or not to clean, that is the question. Some collectors prefer the 'old look' to their pet blow torch. These collectors feel that the oxidation from years of existence adds to the character of their sample. They will make no effort to clean the torch, other than to clean the surface grime and carbon so the torch can be conveniently handled. Many times a thorough cleaning means the total destruction of any labels or decals that are on the torch. These collectors feel that losing these bits of history is too much of a sacrifice for totally cleaning the torch.
Still other collectors completely strip the torch down and polish and buff all parts and then reassemble the torch. Usually the torch is laquered or given some other coating to preserve the newly acquired bright and shiny appearance. It is the primary goal of this style to highlight the appearance of the metals from which the torch was made by cleaning off all traces of oxidation from the smallest nooks and crannies of the sample. Obviously, these collectors do not actually light their blow torches because they are intended for display only.
Other collectors buy the old blow torches to fix them and to light them. This author falls into this category. The samples are cleaned to varying degrees of completeness. Ordinarily, the concentration of effort is given to cleaning the innards of the torch rather than being particularly concerned about the outward appearence. This is mainly a technical hobby because the actual optimization of the torch's operation is of primary concern. Safety is a major issue with this kind of collector. Lighting an old blow torch is very risky business, especially if you get a sample that has been taken apart and incorrectly reassembled by a person that did not know what he/she was doing. The complete incoming inspection, which is routine to this kind of collector, typically reveals these flaws.
There is no one 'right' approach to torch collecting. Many people have strong feelings about their particular approach, but that does not make one approach more right than another does. You are the curator of your own torch museum so the approach you choose is up to you. If you are into making a torch look as good as humanly possible, then you will probably be the polisher/buffer type. If you are into preserving history, then you will probably do a cursory cleaning and not disturb the patina and decals on your samples. If you are a techie, like this author, you will collect torches to light them and consequently, your measure of satisfaction will be in how well the torch works.
Do not allow anyone the satisfaction of intimidating you into believing that your way is wrong. There are as many different ways and philosophies of collecting as there are collectors. I do not know of any rule book anywhere that says one way is the right way. Finally, it is very interesting to get with other collectors and share experiences and show some of your most prized pieces. It is interesting to learn of others' experiences and generally exchange ideas and thoughts. Do not belittle other collectors for their particular policy for collecting. You will be appreciated much more by keeping an open mind and respecting others. A difference in an approach to collecting is not wrong, it is just different.
It is this author's opinion that, regardless of your style of collecting, we all should be diligent about gathering as many facts about our samples as we can, thus preserving the history of gasoline blow torches. Do not improperly reassemble a blow torch if you take it apart. Doing so destroys the historical significance of your blow torch. Learn as much factual history as you can and always credit the source for all your information.
I live about seven miles north of the Turner Brassworks plant in Sycamore, Illinois. We were all shocked around Thanksgiving of 1998 to learn that Turner was planning to close the Sycamore plant forever in January of 99. I believe their last day to be open was 1-29-99. The Turner plant was doing machining work for the brass parts in their propane blow torch. It was sad to hear of their demise. They were apparently the victim of a merger with another tool company that also made blow torches. The Turner plant in Sycamore has been torn down. This was done in about 2005.
The gasoline blow torch was widely used by plumbers and electricians. You may have seen some of the old iron sewer pipes used in old homes. The blow torch was used to help put this piping together. One end of a length of sewer pipe had a "bell" end and the other was the "straight" end. The bell was bigger in diameter than the pipe itself. The plumber would insert the straight end of one pipe into the bell end of another and then pack a fiber type material that looked similar to Manila rope, around the pipe inside the bell end. Two or three winds of this material, called Oakum,(SP?) would be used. Now the blow torch comes in. Between the point where the packing leaves off and the mouth of the bell, the plumber would pour hot, molten lead to seal the joint. The blow torch was used to melt the lead.
Electricians used blow torches in their work as well. You may have noticed the hook on top of the burner head and the vee groove at the mouth of the burner head. These were used to hold a soldering iron in the flame of the torch whereby the electrician would use the soldering iron to solder wires together. The soldering iron was used by radiomen as well as electricians. The other interesting technique used by electricians is that they would twist the wires together in a junction box, then take a ladle that had a swivel mechanism. The ladle was at the end of a steel handle about 18 inches long. The object of the swivel was so no matter what angle the handle was in, the ladle, which held molten lead, would always be vertical. The electrician would walk through his new construction project, hold this ladle up to his freshly twisted wires, and dip the wires into the lead. This was done so the electrical connections would not work loose.
Painters used gasoline blow torches to remove old paint. Some blow torches were specially built with this application in mind. These torches were fitted with a specially built burner head that would produce a fan shaped flame which would tend to cover a wider, narrower area than a standard burner head would produce. Obviously in this application, a concentrated, intense heat is not required unless you want to produce a very crispy-crittered house! Furthermore, torches can be used to remove paint from other things besides buildings. In any event, the painter must consider any hazards that the heat from the torch may produce when used for a particular paint stripping project.
There were a few special application blow torches built. Some of these were intended to serve as leak detectors. They work on the fact that impurities in the fuel will make the flame turn color. When a torch is operating, it draws air into the burner head as the flame is burning. These facts were exploited in the leak detectors in the following way. First, there is a small metal tube about 10 inches long and about .25 inch in diameter that is attached to the burner head near the orifice. Usually, this metal tube is bent such that it follows the fuel tank downward. At the end of the tube, an appropriate sized rubber hose is attached. Then, the torch is lit up in the usual way until the normal loud, blue flame is obtained. It was common to use this arrangement to detect Freon leaks in refrigeration equipment by holding the end of the hose near a suspect leak. If there is a Freon leak, the flame will turn color, usually green. Both quart sized and the small homeowner's torches were fitted with this arrangement.
Obviously, these old blow torches had the same general usage of yesteryear that is enjoyed by the propane torch of today. They were used for anything from thawing pipes to heating up stubborn bolts that otherwise would not come loose.
It is very important to the operation of a blow torch that the torch be able to hold pressure to ensure a good, hot and strong flame. The fuel tank is filled to about 3/4 of the capacity of the tank. With the fuel valve closed and all tank plugs in place, the pump is used to pressurize the tank with air. This air pressure drives the fuel up through the wick tube to the burner head.
The wick tube is part of the pipe that connects the tank to the burner head and it sticks down into the tank to draw out the fuel. In the wick tube is a cotton wick that sticks in the tube about three inches with an additional three to four inches that lay in the bottom of the tank. The torches were designed to be usable in a variety of applications which requires them to be used at almost all conceivable angles of orientation. As the fuel in the tank gets used up, at some angles the wick tube will not be immersed in the fuel and the torch will go out. The wick, by way of capillary action, sucks the fuel out of the tank and into the wick tube.
Just above the wick tube and inside the pipe nipple is a screen type filter, which acts to filter small impurities out of the fuel before it, is burned which helps to keep the orifice from being plugged. An integral part of the burner head is a fuel passageway called the undervein or evaporating chamber. When the torch is burning, the burner head is very hot. Any gasoline in the undervein will be rapidly evaporated due to this intense heat. By locating the undervein at the bottom of the blow torch head, the fuel will be kept hot enough to vaporize the fuel even on cold days and/or in cold environments. The evaporation process builds up pressure between the wick and the burner head. The only way out of the torch is via the orifice, where the fuel is ignited and burned. It is this buildup of pressure that causes the roaring, blue flame in a blow torch. It is in fact, what makes the blow torch...blow.
In the later production brass blow torches, you will notice many holes in the burner head. Some of them will be close to the rear of the torch, while others will be found at the flame end of the torch. During the operation of the torch, the observer will notice small flames protruding from the holes in the flame end of the burner head. This group of holes are there to keep the burner head hot during operation. This in turn ensures that the torch will stay burning even in cold surroundings. The holes at the orifice end of the burner head function as an air intake so the evaporated fuel can mix with air, which is vital for combustion. In some of the Otto Burnz blow torches, the air intake is a triangular shaped hole rather than the round holes common in other makes of torches.
It is vital for the burner head to be at a high enough temperature for the torch to work properly. If the burner head is not hot enough, the flame will be yellow and wimpy rather than blue and roaring. Another symptom is that the raw gasoline will shoot out about three feet and catch on fire. What you have is a flame thrower and not a blow torch! If this happens, it is an indication that the burner head is not hot enough and should be shut down and reheated to the proper starting temperature.
During operation, the wick tube heats up due to its physical connection to the burner head. This heat is conducted into the tank where it heats up the raw gasoline, which helps maintain pressure inside the tank as the fuel is burned. At no time should the tank get so hot that it becomes uncomfortable to hold your hand on the front of the tank. The automatic pressurization is why it is not good to see how much pressure you can pump into a torch by overpumping it. It accomplishes nothing by doing this. You may actually cause a leak to develop!
Begin the physical exam by checking the blow torch tank. Examine it for any cracks or corrosion that may be close to eating through. If it has a fill plug, remove it. Check the threads for damage. Check the fill plug threads as well. Most fill plugs have a lead ring that acts as a gasket. Paint the gasket with white-out and screw the plug back in snugly. Remove it again and make sure the white-out is evenly worn. This indicates that there is good contact between the tank and the fill plug. Hold the tank and attempt to twist the burner head. This test will indicate if the nipple coupling in the tank is tight. Some torches get loose at this point. Check the handle and handle bracket looking for signs of metal fatigue. Make sure the drive screws that hold the handle in place are secure.
We now move on to the pump. Unscrew the pump from the torch and examine it for dents or other mechanical damage. Unscrew the brass cap that holds the plunger in place and remove the plunger. Now, examine the leather by slightly bending it away from the cup washer and see if the leather has a tendency to crack. If it does, it will have to be replaced. If the leather does not break or fall apart, liberally oil it with ordinary motor oil and 'work' it to limber it up, looking for further signs of cracking. Examine the hardware that holds the leather in place. If it is all rusty, replace all common hardware with new and carefully buff all rust from the other parts. Most pump handles have a spring. Verify that this spring is in place and that it is healthy. Replace as necessary and Reassemble the pump.
Next, examine the check valve. Each manufacturer has their own style so you will have to figure out how to safely take it apart. There is a spring inside, so do the disassembly somewhere where small parts that may fly out will not get away from you. Make sure that the brass check valve plunger is clean. Look inside the plunger and make sure that the packing is intact. Usually, this is a little block of cork and is frequently rotted or missing. Verify that the plunger spring is clean and that it can move freely inside the check valve body. Often times the opening at the bottom of the pump chamber is plugged up, especially if the cork has rotted. Check this opening and clean it out if required. When you are satisfied that the check valve has been completely checked out, reassemble the check valve and set the pump assembly aside for now.
Remove the valve stem and packing nut from the back of the burner head. Unscrew the valve stem and packing nut at the same time; Remove them as an assembly. If you totally unscrew the valve stem from the packing nut, you can grind down the packing in the process of unscrewing the valve stem and thus create a leak. You don't want to do that. Carefully examine the valve stem and look for corrosion and/or carbon buildup and clean all this rust and other buildup off of the valve stem. When you are done, you should have a shiny, like new looking valve stem. Make sure that the packing nut is tight on the valve stem. If it is not, you will have to repack it with graphite packing string. Hold the torch up to an incandescent bulb and aim it at the light while you look down the end of the burner head where the valve stem was removed. You should be able to look through the orifice, which is about .014 inch in diameter. If you cannot see through it, obviously it is plugged. Use some appropriately sized steel music wire to open the orifice, but do not force anything too big through the orifice! Doing so will enlarge it and ruin the burner head. Take a small wire brush and clean the valve stem nest completely.
We now move on to the fuel passageways in the burner head. Not all torches have these passageways; Whatever the fuel path is from the input of the burner head to the orifice, it MUST be spotlessly CLEAN! Most torches have 8-32 or similar screws in the burner head that can be removed to inspect/clean the passageways and it is common for these to fill with carbon deposits. Look for this and clean it out if you see any. Clean out ALL traces of carbon from the fuel path. The screws may be hard to remove from a cold burner. Do not force the issue or you will break the screws! The best trick is to heat the burner head up with...eh...a blow torch and get it very hot! Now, the screws should come right out.
Remove the fuel nipple from the tank at this time. Frequently, the nipple will be corroded to the point where it will be difficult to remove it. Try using penetrating oil and let the torch sit for a couple of days. If you have vise shoes for your vise, please install them. Turn the torch upside down and carefully clamp down the jaws of the vise onto the burner head. It does not have to be tight! All you are doing is preventing the burner head from moving around while you are loosening it. Now, grasp the tank with both hands and turn the tank to break the fuel nipple loose, resisting the temptation to rely on the torch's handle for leverage. If you still can't break it loose, have an assistant grip the tank,too and both of you try turning it.
Once the burner head and fuel nipple are removed from the tank, again clamp the burner head in the vise. Use a small pipe wrench to remove the fuel nipple/wick tube from the burner head. I have found that a rapid yank on the pipe wrench is more effective than a slow pull when removing the fuel nipple. If your torch has a fuel nipple and wick tube that come apart, go ahead and separate them at this time. Examine the wick and look for impurities stuck in the wick, such as carbon or rust. Pull the wick out of the wick tube and replace it if it is dirty. Verify that there is about four inches of wick available to lie at the bottom of the tank. If not, replace the wick.
Check the inside of the fuel nipple to verify that it has a screen filter. It is not uncommon for torches to be missing this item. If it has a screen, frequently it is loaded up with carbon. It is best to replace this screen, which is simply a piece of .040 X.040 screen cut 1 inch by about 4 inches and it is rolled up so it fits inside the fuel nipple. Once you have removed the old screen, carefully and completely clean the inner surfaces of the nipple until it is shiny clean! Then install the new screen and put the wick tube back on. If the wick is installed right, it should just barely peek out of the end of the wick tube, The screen should be even with the top of the fuel nipple. If your fuel nipple and wick tube is one piece, install the screen as described and shove the new wick in until it hits the bottom of the screen.
Reinstall the fuel nipple into the burner head. Be sure to put pipe dope on the threads, but don't use too much! When you reinstall the nipple, tighten it so it is just snug. Use pipe dope on the threads that screw into the tank, remembering just to snug it up. Do not forget to reinstall the drip cup if you removed it! If it is an off-center drip cup, orient it so the longest end of the drip cup is under the orifice end of the burner head.
Reinstall the pump at this time. Be sure to repair all discrepancies found if you choose to fuel the torch! If all is well, fill the torch about half full of water and pump it up. Examine the torch for any leaks. Be sure the system holds pressure by letting it alone for an hour or so. You can see if the check valve is leaking by removing the plunger from the pump; Leave the pump body screwed into the tank! If the check valve is working, you should not see water accumulating in the bottom of the pump. If you do, the check valve is bad. If there are no leaks, open the fuel valve about four turns and you should see a small stream of water shooting out of the burner. The stream should go about three feet if the tank was pressurized up to 40 pumps. If the torch passes all these tests, it is ready to take fuel! Empty out the water as best you can, remove the pump and fuel plug if it has one, and let the torch dry in the sun. On initial fireup, it will probably be stubborn until you drive all that water out of the wick.
I have a blow torch that I like real well and I want to know if it would work without actually putting fuel in it. This is actually very easy to do. This test procedure consists of two parts. One is to verify that there are no leaks by proving that the system can hold pressure. The second part proves that the system is not plugged up by proving that fluid can flow through the fuel delivery system. To start the test, begin by making sure that the pump is working. Then oil the leather and then check that the fuel valve is capable of free operation and that it is completely shut off. See the description above about how to test your pump.
Then, fill the torch 3/4 full of clean, distilled water and pump up the tank with 40 strokes of the pump handle. Let the torch sit for about five minutes and then examine it for any leaks anywhere on the tank or around the packing nut or the fuel fill plug. Operate the pump plunger a couple of times to see if it tends to fill with water. If it does, the water will squirt out around the pump handle as you operate the pump plunger. Watch the pump plunger to see if it tends to slowly rise out of the tank and if it does, that means the check valve is bad. Next, with the torch filled with water and pressurized to 40 pumps, open the fuel valve about five turns counter clockwise. You should see a stream of water shoot out the burner head for three to four feet. If you do, the system is not plugged up and is operating normally. Only let the water stream out for a few seconds and then shut off the fuel valve.
Finally, let the torch sit for about an hour and reexamine it for external leaks, rising pump handle or water accumulation in the pump. What you are doing here is verifying that your torch does not have any slow leaks. Do not repressurize the torch this time; that would be cheating. Open the fuel valve again and see if the water streams out for three or four feet. If you get the same results this time as you did the first time, your torch is in fine shape and would probably work! After you are through checking everything out, drain the water out of the torch and do everything you can to dry the system out.
No procedure is without its disadvantages. Water that sits in a steel blow torch tank can cause it to rust. Obviously, it can rust other steel components of the torch as well. Therefore, be sure to completely dry out the torch after the tests have been completed. This author has seen samples where this test revealed no leaks, but when it was filled with fuel, a leak showed up! This is apparently due to the difference in viscosity of water and gasoline. This experience demonstrated that this test as described, is not completely accurate.
The most common problems with these old torches are bad or leaky check valve, leaky tank caused by rust-through or stress cracks and a plugged up fuel system and/or orifice. Sometimes the check valve will have a very slow leak, which will cause the water stream to fall short. You will then have to decide if the deteriorated performance is serious enough to warrant the repacking of the check valve to stop the slow leak. If you find that, in the first test the water streams about three feet but in the second test it streams out for a few inches, you probably should fix the check valve. If there is only six inches or so discrepancy between the two tests, the check valve is probably good enough to leave alone.
Understand that in actual operation, the heat from the torch warms the gasoline, which tends to raise the pressure in the tank. Sometimes this natural pressurization is enough to keep up with a slow leak. In cases where the check valve leaks too much, in actual operation it will be necessary to repressurize the torch several times for a given tank of gasoline. If the check valve is leaking badly, it will allow gasoline to leak out (in actual operation). If one were to light a blow torch, one would find that repressurizing an operating torch would be required once at the most on a given tank of gasoline. Zangobob's Blow Torch Heaven owns a Craftsman torch that will burn the entire tank of gasoline without requiring the tank to be pumped up again. One or two repumps is about the norm for a fair to good working blow torch.
There are safety issues to remember when collecting old torches. This is not intended to be an all inclusive list of safety measures. It DOES NOT cover safety issues for LIGHTING a gasoline blow torch, which would result in a huge document. These guidelines only apply if you simply want to display your torches, it only scratches the surface and it is only my opinion.
This is a tough question to answer. I am going to stay away from trying to put a specific value on what a blowtorch should be worth. I will, however be happy to offer you some general guidelines. The better the condition, the more a given torch is worth. My personal preference on condition is its ORIGINAL condition. Most collectors will pay more for torch in nearly new condition than they will for one that has been buffed and lacquered. If you are new to collecting torches, we recommend that you check out Ebay and do a search under the Completed Auctions category. What other people have paid for a similar one in which you are interested, is probably a good starting point.
Over a few years' history of attending antique sales, we have found that in many cases, torches sell cheaper there than on Ebay. This is true especially for the common Clayton Lambert and Turner torches. The real unusual ones on sale at an antique show typically sell for less money than if the same torch was found on Ebay. By comparing the antique show prices from one year to the next, this author has found a definite trend in rising prices across the board for blow torches from 1998 to those of 1999. This is either due to an increased interest in blow torch collecting or due to more antique dealers selling on the internet, or possibly both factors.
Obviously, the more you want the torch, the more you will probably have to pay in an auction situation. If you are bidding on a torch that's used but not very dirty, it is reasonable to expect to pay $15 to $20 for it. For the real dirty, crusty ones, I personally will not give more than $5 to $10. Be sure that what you are getting is a physically complete torch, unless you are buying one for parts.
If you decide to buy your blow torches on Ebay, Zangobob's Blow Torch Heaven strongly recommends that you take your time. Watch the final sale prices very carefully and take note of the number of common torches compared to the number of uncommon ones. Note the number of torches where the auction ends with no bid. Note the kinds of torches that result in a no-bid. Sometimes there will be one or two newbie torch collectors on Ebay that are completely without a clue and will place outrageously high bids on total junk. Be watchful for this kind of bidder and do not let this situation skew your statistics. After observing for two weeks or so, proceed to bid on your first torch. It would be best to restrict your first auction to a common torch just to get a feel for how the auction goes. Rely on Ebay's proxy bidding system. If you do not know what this is, check out Ebay's site map and search out the explanation. Basically, you enter your absolute top dollar amount, not a penny more, that you are willing to pay for the torch. Ebay's computer will automatically raise your bid without your intervention until your proxy amount is reached. obviously if people bid less than your proxy, most likely you will get the torch for less than the proxy amount. This saves you from having to baby sit your auction until it closes.
If you are interested in old, rare blow torches, we will likely be of little help to you in figuring out how much to pay. A fair price is determined by many factors, such as age, rarity, condition, manufacturer, demand, etc. Obviously, the amount of money you have to spend is, more likely than not, the biggest factor!
Here are some links to my other Internet sites
Feel free to email us with questions/suggestions!